I hate to admit it, but I have a pretty short attention span. And I have a tendency to get really really excited about things. These two traits combined means that when I get an idea in my head, I NEED to do it right then. I plan the whole thing out in my head and I spend all day thinking and dreaming about it. And if I act on these impulse ideas, which usually require spending money, I suddenly don't care about them anymore. The lust is gone, and suddenly I've spent money on something that I didn't need and now don't even want.
Thus I have instigated the thirty day rule in my life.
This is sort of a standard tip for saving money, but it really works. When I get the idea, I write it down (usually in my google docs so I can organize it and re-access it easily), and then I wait. Despite the temptation to act on it immediately and buy up the entire local home depot, I continue to wait.
And then a few weeks later I browse back through my Google Docs and am able to weed through the ideas. Miraculously, I don't care about 99% of them anymore. If I am still as excited about an idea as I was originally, I know that it's something that is worth my time and money. And if I'm not, it gets trashed.
This rule has saved me tons of money and time over the years because I'm not just spending and projecting willy nilly. I take time to think through the projects that I want to undertake and try to only do the necessary and important ones. Emphasis on try...
Showing posts with label Skills that Save Money. Show all posts
Showing posts with label Skills that Save Money. Show all posts
Feb 4, 2011
Dec 3, 2010
Decorating For The Holidays On A Budget (Merrick)
I love decorating for Christmas, but every year I struggle with our small space, the additional cost on top of gifts, and good ideas that aren't tacky.
Despite my past failed attempts, I was determined to come up with something good. So this year I turned to my new best friend, the dollar store. The store closest to me is The Dollar Tree, and they have an excellent selection of Christmas items -- all for only one dollar! So after a little inspiration from blogs, I made my way to the store and picked up a few fun things. Let me show you what I ended up with:
 [three ornament packs, two Dollar Tree vases, one vase I already owned, ribbon from Christmas last year, serving platter I already owned]
 [half a pack of ornaments, vase I already owned, candle I already owned, ribbon from last year]

 [2 Dollar Tree vases, 1/2 a pack of DT ornaments, 2 packs of DT candy canes, ribbon from last year]
 [old picture frame, free printable art from a blog]
 [vase I already owned, berry branches from my front yard spray painted white and sprinkled with glitter]
I'm really happy with how these decorations turned out. They're classy and pretty, and best of all I spent less than $10 on everything. It is possible to decorating for the holidays without blowing your budget!
How are you saving on your holiday decorations this year?
Despite my past failed attempts, I was determined to come up with something good. So this year I turned to my new best friend, the dollar store. The store closest to me is The Dollar Tree, and they have an excellent selection of Christmas items -- all for only one dollar! So after a little inspiration from blogs, I made my way to the store and picked up a few fun things. Let me show you what I ended up with:
 [three ornament packs, two Dollar Tree vases, one vase I already owned, ribbon from Christmas last year, serving platter I already owned]
 [half a pack of ornaments, vase I already owned, candle I already owned, ribbon from last year]
 [2 Dollar Tree vases, 1/2 a pack of DT ornaments, 2 packs of DT candy canes, ribbon from last year]
 [old picture frame, free printable art from a blog]
 [vase I already owned, berry branches from my front yard spray painted white and sprinkled with glitter]
I'm really happy with how these decorations turned out. They're classy and pretty, and best of all I spent less than $10 on everything. It is possible to decorating for the holidays without blowing your budget!
How are you saving on your holiday decorations this year?
Share To:
Nov 14, 2010
What are Your Top 5 Skills? (Carole)
Early in our marriage, David and I had a lively conversation about the Five Most Valuable Skills each of us possessed. I don't remember why this topic came up or how come we settled on the number 5. However, the subject still comes up every once in awhile, and it's interesting to see how some of our answers have changed over the years, but amazingly not too many -- those valuable skills have remained valuable!
Our definition of "valuable" is very loose. It could mean that you earn money with this skill, it could mean that you save money with this skill, it can mean that this skill brings you pleasure, or that you just find this skill to be extremely useful. The following lists are not in any particular order.
David's Top 5 Skills List:
1. Writing an outline
2. Writing a thesis statement
3. Typing
4. Public speaking
5. Wood working
Carole's Top 5 Skills List:
1. Playing the piano
2. Knitting/Crocheting/Sewing
3. Reading
4. How to paint a room
5. Typing
As we raised our children, we tried to keep this idea of Valuable Skills in mind as we signed them up for school courses, extra curricular activities, lessons, sports and also as we passed on the skills we personally had. What experiences and/or skills might turn out to bless their future lives? These will be among their most important assets and should not be ignored.
Take a few minutes and think about what you've learned through your life that has turned out to be valuable to you. I'd love to hear what some of your answers are.
Share To:
Oct 22, 2010
Homemade Baby Food (Merrick)
.jpg) Two months ago I started my baby on solids. We did rice cereal for the first month and then moved on to pureed fruits and veggies. My friend had some left over Gerber baby food from her son, so she gave it to me and we have used that for the last month. And all the while I thought that after all that free baby food ran out, I would probably just continue buying it from the store because it wasn't that expensive and was convenient. That is, until my friend mentioned that as babies get older they eat about five jars of food per day, and it was costing her nearly $20 extra on her weekly grocery bill. And that's only for one baby.
Two months ago I started my baby on solids. We did rice cereal for the first month and then moved on to pureed fruits and veggies. My friend had some left over Gerber baby food from her son, so she gave it to me and we have used that for the last month. And all the while I thought that after all that free baby food ran out, I would probably just continue buying it from the store because it wasn't that expensive and was convenient. That is, until my friend mentioned that as babies get older they eat about five jars of food per day, and it was costing her nearly $20 extra on her weekly grocery bill. And that's only for one baby. So I did a little online research, scoured the baby isle at the grocery store, made some homemade baby food, and then came up with this little comparison.
Gerber is the cheapest at my grocery store (Smiths). The cost for 5 ounces of baby food (for my son's age group) is $0.95. These are several of the options they offer at my store, so I made each of these from fresh produce and here are the price comparisons*:
Bananas
- Homemade: $0.19 for 5 oz.
- Store Bought (Gerber): $0.95 for 5 oz.
- Savings: $0.76 or 80%!
Pears
- Homemade: $0.34 for 5 oz.
- Store Bought (Gerber): $0.95 for 5 oz.
- Savings: $0.61 or 64%!
Green Beans
- Homemade: $0.61 for 5 oz
- Store Bought (Gerber): $0.95 for 5 oz.
- Savings: $0.34 or 36%!
Carrots
- Homemade: $0.42 for 5 oz.
- Store Bought (Gerber): $0.95 for 5 oz.
- Savings: $0.53 or 56%!
Sweet Potatoes
- Homemade: $0.27 for 5 oz
- Store Bought (Gerber): $0.95 for 5 oz.
- Savings: $0.68 or 72%!
So although another mouth to feed will certainly increase your weekly grocery bill, making your baby food can make the blow a little lighter. Also keep in mind that different stores have different produce costs. If I had a bigger freezer to store a lot of baby food, I would go to Sam's or Costco and buy produce in bulk, and then these prices and savings would be even better.
Now you do have to take into account the cost of your time, because time is money! If you are incredibly busy and you're straining to make time to do this, then $0.95 is probably worth it to you. And there is nothing wrong with that.
However, let me tell you that the amount of work that I put into making this baby food was minimal (the amount of mess, on the other hand...that was not minimal). I have a vegetable steamer, so all I did was wash, peel, and chop the produce, throw it in the steamer for 15 minutes until it was soft, then toss it in the food processor with a bit of water. Once it was pureed I poured it into ice trays (that I got at the dollar store, 2 for $1), froze it until they were hard, then put them back in the freezer in labeled baggies.
Total hands on time for each item was probably five minutes. So easy.
This coming week I'm going to try making it from canned fruits and veggies to see if it cuts down on the preparation time (since many items probably won't require steaming), and see how the price differs from fresh produce. So stay tuned for a post about that next week!
*this comparison chart involved some math, and I'm an artist. Don't judge too harshly if there are some calculation mistakes..
Share To:
Oct 1, 2010
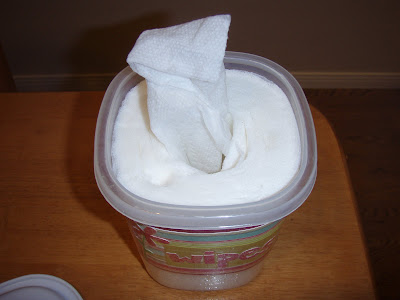
Homemade Clorox Wipes (Merrick)

Because several of you asked so nicely, I went on the hunt to find a way to make homemade clorox wipes. Turns out it's pretty darn easy, and surprisingly similar to making homemade baby wipes. I found probably five different recipes for it, and here is the common theme:
Homemade Clorox Wipes
1/2 roll extra strong paper towels (I've heard Bounty is good..)
2 and 1/2 cups water
1/4 cup bleach
Cut your roll of paper towels in half and place in your tupperware (just like with the baby wipes). Boil water, add bleach, pour over paper towels. Remove wet cardboard tube. To use, pull out wipes one at a time from center.
Also, here's another recipe if you want something a little more natural (aka. no bleach)
Natural Disinfectant Wipes
1 cup witch hazel
1/2 teaspoon tea tree oil or peppermint oil (natural disinfectant)
1/2 cup water
Prepare your paper towels in the tupperware. Mix the three ingredients together and pour over your paper towels. Remove tube.
Share To:
Sep 24, 2010
Homemade Wipes: Part 2 (Merrick)
Two weeks ago we had a guest post by the lovely Britt, of the Skinny Bovine's Kitchen, where she taught us to make homemade wipes.
Have you tried them yet?? I haven't yet, but I'm looking forward to saving tons of money and having some bragging rights about the fact that, you know, I make my own baby wipes.
Well Britt has kindly provided us with some photos of her wipes, which will probably make your project a little easier.

Also, just for your convenience, here are the directions again:
Buy a Rubbermaid, Servin' Saver, 6 cup container. I know you can find them in a 3 pack (with 1 bigger and 1 smaller) but I haven't had much luck finding them by themselves. They are pretty much exactly the shape of 1/2 a roll of paper towels, with a rounded-edge square lid.
The paper towels that fit perfectly (once cut in half with a sharp knife) in them are the regular Bounty ones (not jumbo roll, I buy the 8 pack, makes 16 batches of wipes). I use 1/2 a wipe at a time. Though we recently discovered that the bigger roll Bounty towels that are separated into 1/2 size paper towels work great too if you just tear off a few of the paper towels before you cut them. Then they are already 1/2 sized and you don't have to tear them. (This is my husband's preference). My aunts swear by homemade wipes, but they also say that Bounty is the only brand that really works, so I haven't experimented much there.
To make them: stuff 1/2 a roll of paper towels into your tub. In a bowl, combine 1 1/4 cups water + 1 heaping Tb baby soap (I use the Wal-Mart brand Johnson & Johnsons copy). Pour over the top of the wipes. They probably need an hour to soak all the way through and then you can just pull out the cardboard in the middle and you're good to go.
Thanks for sharing your awesome saving tip, Britt!
Have you tried them yet?? I haven't yet, but I'm looking forward to saving tons of money and having some bragging rights about the fact that, you know, I make my own baby wipes.
Well Britt has kindly provided us with some photos of her wipes, which will probably make your project a little easier.


Also, just for your convenience, here are the directions again:
Buy a Rubbermaid, Servin' Saver, 6 cup container. I know you can find them in a 3 pack (with 1 bigger and 1 smaller) but I haven't had much luck finding them by themselves. They are pretty much exactly the shape of 1/2 a roll of paper towels, with a rounded-edge square lid.
The paper towels that fit perfectly (once cut in half with a sharp knife) in them are the regular Bounty ones (not jumbo roll, I buy the 8 pack, makes 16 batches of wipes). I use 1/2 a wipe at a time. Though we recently discovered that the bigger roll Bounty towels that are separated into 1/2 size paper towels work great too if you just tear off a few of the paper towels before you cut them. Then they are already 1/2 sized and you don't have to tear them. (This is my husband's preference). My aunts swear by homemade wipes, but they also say that Bounty is the only brand that really works, so I haven't experimented much there.
To make them: stuff 1/2 a roll of paper towels into your tub. In a bowl, combine 1 1/4 cups water + 1 heaping Tb baby soap (I use the Wal-Mart brand Johnson & Johnsons copy). Pour over the top of the wipes. They probably need an hour to soak all the way through and then you can just pull out the cardboard in the middle and you're good to go.
Thanks for sharing your awesome saving tip, Britt!
Share To:
Sep 10, 2010
Homemade Wipes (Guest Post By The Skinny Bovine)
I'm so honored to guest post on my very favorite frugal blog! Thanks, Merrick!
By way of introduction, I'm Britt of The Skinny Bovine's Kitchen, also previously next door neighbors to the Frugal Wives' whose blog we all love so much. I blog about eating healthy on a very tiny budget - hope you stop by! In addition to being food-frugal though, I'm pretty frugal with other things as well since after almost five years of marriage/school and 2 kids my husband is starting his first real job this month! I'm so thankful for what I've learned the past five years and it forever continues to shape my spending, so I'm always looking for other ways to save a buck.
Two of my aunts love and swear by homemade wipes (10 kids between them) and I learned and adapted this recipe from them. I love them because they are much cheaper and much less wasteful than normal wipes. Do you hate using an entire store bought wipe just to make sure baby's bum is clean after a pee-only diaper? No more! Just tear off a piece just big enough to do the job and viola! Clean bum, happy mom, money in your wallet.
Here are your rough directions. Adapt according to your liking!
Buy a Rubbermaid, Servin' Saver, 6 cup container. I know you can find them in a 3 pack (with 1 bigger and 1 smaller) but I haven't had much luck finding them by themselves. They are pretty much exactly the shape of 1/2 a roll of paper towels, with a rounded-edge square lid.
The paper towels that fit perfectly (once cut in half with a sharp knife) in them are the regular Bounty ones (not jumbo roll, I buy the 8 pack, makes 16 batches of wipes). I use 1/2 a wipe at a time. Though we recently discovered that the bigger roll Bounty towels that are separated into 1/2 size paper towels work great too if you just tear off a few of the paper towels before you cut them. Then they are already 1/2 sized and you don't have to tear them. (This is my husband's preference). My aunts swear by homemade wipes, but they also say that Bounty is the only brand that really works, so I haven't experimented much there.
To make them: stuff 1/2 a roll of paper towels into your tub. In a bowl, combine 1 1/4 cups water + 1 heaping Tb baby soap (I use the Wal-Mart brand Johnson & Johnsons copy). Pour over the top of the wipes. They probably need an hour to soak all the way through and then you can just pull out the cardboard in the middle and you're good to go.
Hope you love them as much as I do! Happy wiping!
Share To:
Aug 13, 2010
Cooking With a Crock Pot (Merrick)

I ran across an article on Brokelyn.com last week. It was about cooking cheaply with a crock pot -- you can find the full article here.
Basically the article just talks about this guy that started using his crock pot to make one big meal that would last him a week. His crock pot creations started out pretty bad, but he soon discovered quite a few great recipes that he could make very inexpensively and that would last all week. His food savings were huge because he was only making one meal a week, but also his time savings were pretty big. And as we all know, time is money.
This got me thinking about cooking using the crock pot. I love the idea of spending $15 a week on food -- we certainly spend more than that -- but I don't love the idea of eating the same thing every day for lunch and dinner for seven days straight. So I'd like to think of this in the sense that time is money, so we're saving money by saving time. If you've ever cooked with a crock pot, you know how easy it is. It's my favorite Sunday meal because I can throw everything in before we leave for church, and then come home to a delicious smelling house and have dinner on the table in less than ten minutes. But really this is pretty much the extent of my crock pot use.
Then, a few months ago, I ran across a recipe that was for dessert made in the crock pot, and this opened up an entire new world of adventurous cooking. I realized I could use this great tool to make more than just a Sunday dinner roast. I could make soup, pasta dishes, rice dishes, fondue, caramel dip, cake, and a million other categories of food. Oh, the things I've been missing out on, like all these amazing sounding desserts! Who knew you could use a crock pot to make all of those? Think of all the time you could save by making a four course meal all in the crock pot (that is, if you had four crock pots...).
So, are you crock pot users? Are you adventurous and make a wide variety of food in the crock pot? Or, like me, do you mostly just use it for roasts? Do tell...and share your recipes if you're so inclined.
Share To:
Aug 4, 2010
Eating On a Dollar A Day (Carole & Janssen)
I'm out in Boston with Janssen and her sweet new baby. Plus her little family is days away from a move across the country. We're a bit busy, to say the least! So, rather than writing a post today, we're sharing a very interesting Time Magazine article, and the accompanying blog, about 2 people who are feeding themselves on $1 per day. Maybe a bit extreme, but it will get you thinking about your own food budget in a whole new way!
You'll quickly notice that they eat vegan.
Time Magazine Article
http://www.dollaradaybook.com/blog
Hope you're having a happy, happy day!!
You'll quickly notice that they eat vegan.
Time Magazine Article
http://www.dollaradaybook.com/blog
Hope you're having a happy, happy day!!
Share To:
Jul 29, 2010
Knock-Off Wood (Merrick)
Recently one of our faithful readers, Natalie, emailed us to share a website she'd found. It's called Knock-Off Wood. Have you heard of it?
Let me tell you a little bit about it.
The creator, Ana White, is a furniture designer and builder. In her blog bio, she says this: "I'm just a stay at home Mom with expensive taste and no money. But money (or rather the lack of money) is not going to keep me from making our home comfortable, organized and stylish."
I'm sure there are many of us that can relate!
Without any formal training, she has learned how to look at retail furniture, then go home and duplicate it. Unbelievable! Her blog is a forum where she shares her designs FOR FREE, and lets other people share their building success stories.
I fell in love with her blog after moments of perusing, not only because she has everything organized by skill level, type of furniture, style of furniture, and many more, but mostly because all of her pieces are so so inexpensive. If you look at the "search plans by estimated cost," there isn't a category over $200. Can you imagine being able to build an RC Willey bed or a Pottery Barn armoire for less than $200??
I, personally, am not a builder, but her plans are so simple that even beginner carpenters (like me) could build a lot of these pieces. Each plan has a supply list, a cut list, a tool list, and then step by step instructions on how to build the furniture. With the help of the nice men at Home Depot who will cut your wood for you (and even though they have a sign that says $0.25/cut, they never charge me), you don't even need a saw!
This website is an amazing resource for people looking for inexpensive furniture. Yes, it takes some time and effort, but I think the price makes it worth your while. Plus, you'll have unbelievable bragging rights for the rest of your life.
The second I have a new house and room for some new furniture, I'm building myself this. Or maybe one of these. Or maybe I'll just make one of everything.
Share To:
Jul 2, 2010
DIY Gifts: Part 2 (Merrick)
Though I might feel like a good gift giver most of the time, my confidence was definitely shaken when I got married and threw in-laws into the mix.
For my mother-in-law in particular, I spend a lot of time stressing over gifts for her. That's why when I stumbled upon an embellished serving tray on a crafting blog (it's been so long I have no idea what the source is -- sorry), I thought it would make a great gift for her so I immediately saved the link and began my preparations to make the gift.
 (pre-grouting)
Materials:
- black serving tray from IKEA - $7
- mini tiles from home depot - $5 (you could also buy a few large tiles and smash them up)
- dry grout - $5 (I only used a tiny bit, so I used this for future projects)
- grout sealer - $5 (same thing -- I only used a tiny bit)
Approximate cost to make this tray: $13
This was a pretty easy project, and when all was said and done it looked awesome. And my mother-in-law really liked it.
Now stop stressing about in-law gifts and go make one of these. It's sure to be a pleaser.
Share To:
Jun 29, 2010
DIY Gifts (Merrick)
I like giving gifts, and I've always considered myself pretty good at it.
Because gift giving is important to me, but I have many people to buy for, I have a few criteria when coming up with a gift:
- inexpensive
- easily duplicated for multiple birthdays (I'm all about finding gifts that I can do for both of my sisters and my sister-in-law)
- creative
- DIY (because I think homemade gifts are just a little more personal (but take note I don't always give homemade gifts))
- somewhat easy
So, like Janssen does with Christmas gifts, I spend the whole year coming up with ideas: scouring crafting blogs, jcrew, anthropologie, and other websites, and then saving the image or the link so I can easily refer back to it.
One of my favorite DIY gifts that I've made and given to many people is an embellished t-shirt. The idea came from a top someone was wearing in a TV show. After watching the show and spending the rest of the day thinking about that shirt, I scoured hulu.com until I found the scene, took a screen shot, and saved it to my "to make" computer file. Then that week I went out and bought the material to make it.
Here's how it turned out:
 I love this shirt so much that I have to force myself not to wear it every single day.
You can do it a myriad of ways but here's how I did it:
Materials:
- one t-shirt (when I'm doing these as gifts, I wait until Old Navy, Kohls, or Target is having a sale and I buy them for $5)
- 1/4 yard fabric in the color of your choice (Joann's always has cheap cotton in a million colors, and often has 40% off coupons available online -- this makes it less than a dollar, usually)
Directions:
1. Cut the fabric into long strips about 3 inches wide, then twist and spiral each strip of fabric around itself to make a flower
2. Using a sewing machine or needle and thread, make stitches in several places around the flower to secure the shape
3. Repeat for each flower
4. Using a sewing machine or needle and thread, tack each flower to the neckline of the shirt
5. Using a needle and thread, sew the edges of the flowers together so they don't gap when the shirt stretches over your body.
Approximate cost for this darling embellished t-shirt: $5.80
With a price like this, you should be making these for everybody you know.
Because gift giving is important to me, but I have many people to buy for, I have a few criteria when coming up with a gift:
- inexpensive
- easily duplicated for multiple birthdays (I'm all about finding gifts that I can do for both of my sisters and my sister-in-law)
- creative
- DIY (because I think homemade gifts are just a little more personal (but take note I don't always give homemade gifts))
- somewhat easy
So, like Janssen does with Christmas gifts, I spend the whole year coming up with ideas: scouring crafting blogs, jcrew, anthropologie, and other websites, and then saving the image or the link so I can easily refer back to it.
One of my favorite DIY gifts that I've made and given to many people is an embellished t-shirt. The idea came from a top someone was wearing in a TV show. After watching the show and spending the rest of the day thinking about that shirt, I scoured hulu.com until I found the scene, took a screen shot, and saved it to my "to make" computer file. Then that week I went out and bought the material to make it.
Here's how it turned out:
 I love this shirt so much that I have to force myself not to wear it every single day.
 You can do it a myriad of ways but here's how I did it:
Materials:
- one t-shirt (when I'm doing these as gifts, I wait until Old Navy, Kohls, or Target is having a sale and I buy them for $5)
- 1/4 yard fabric in the color of your choice (Joann's always has cheap cotton in a million colors, and often has 40% off coupons available online -- this makes it less than a dollar, usually)
Directions:
1. Cut the fabric into long strips about 3 inches wide, then twist and spiral each strip of fabric around itself to make a flower
2. Using a sewing machine or needle and thread, make stitches in several places around the flower to secure the shape
3. Repeat for each flower
4. Using a sewing machine or needle and thread, tack each flower to the neckline of the shirt
5. Using a needle and thread, sew the edges of the flowers together so they don't gap when the shirt stretches over your body.
Approximate cost for this darling embellished t-shirt: $5.80
With a price like this, you should be making these for everybody you know.
Share To:
May 25, 2010
DIY (Carole)

I grew up in a home where it seemed like my dad could make or fix anything. Now that I'm an adult, I'm pretty sure that was not really true, but it seemed that way to me when I was a kid. For instance, my mother wanted a 2nd linen closet in the upstairs hallway. Dad sketched some plans, cut a large hole in the wall and within a couple of weeks there it was -- looking just as permanent and finished as the original one on the other side of the bathroom door. He also painted every room in the house, refinished our kitchen cupboards, upholstered several pieces of furniture (with the help of my mother), painted the outside of the house and dozens of routine plumbing and electrical jobs during my 18 years at home. I remember many interesting trips to the hardware store to pick up some part or other to repair an appliance that had gone AWOL. I often had the fun job, as a little girl, of handing him tools while he tore something apart before putting it all back together again.
Naturally, when David and I got married I assumed he would be right on the same page with this whole DIY lifestyle. Don't all men have these skills? Aren't they hardwired into the male DNA?? Uh, no. And even though I'd made a hundred trips to Ace Hardware with my dad, I didn't have a clue either. Watching was not the same as learning, it turned out.
But David (mostly) and me are living proof that these skills can be learned. We started small with a couple of low-risk painting projects. Painting has much to recommend itself as a beginning place. Not only is it pretty inexpensive, but it is easily painted again if things go bad. My children can attest to the dozens of rooms we have painted over the years. We've saved ourselves thousands of dollars in labor costs and it gave me a much-needed creative decorating outlet when our budget was tight, tight, tight. David used to joke that I was losing square footage on the house by repainting some of the kids' bedrooms so often!
While in dental school, we lived with an elderly woman in a beautiful home by Lake Michigan. Amazingly she had NEVER owned a dryer. I know, it's hard to even imagine that. But there you are. We were unwilling to live without a dryer, being the young, modern twenty-somethings we were. Happily, we had friends with real jobs who were looking to get rid of their old dryer. They just gave it to us because it was very, very noisy. They'd had this dryer for a few years while in college (having purchased it used from other college students) and the cause of this loud racket had never been discovered by the several repairmen they'd brought out to their house. David hauled our "new" dryer into the basement and hooked it up. Sure enough, a very very loud and annoying scraping sound emanated from deep inside the drum. I was willing to live with this, but David was sure that the cure couldn't really be that tough to find. His fix-it rule is that you keep removing screws and taking off parts until you find something broken -- then you replace that. I'm here to tell you this simple method works the majority of the time. You just have to keep close track of all those screws you took off! He used this technique on the dryer, eventually found the broken piece, took that broken piece down to the Sears Parts store and we ended up with a super-quiet dryer that we used for the next 10 years. I think his total cost was under $10. When we finally bought a nice matched washer and dryer, we sold this dryer for $120!
In our first house we had beautiful wood floors in the upstairs. Unfortunately that half held all the bedrooms. This made for some very chilly feet in the frigid mornings in Wisconsin. The living spaces downstairs, however, had ugly linoleum and wall to wall carpet. So, one crisp fall morning, I bought a specialized crowbar and began ripping out the wood floor in our bedroom. By the time David got home from work the deed was done. There was no turning back. He spent the next 2 months laying that wood down in the kitchen (I took the girls on an extended vacation . . .). And we had the bedroom carpeted. We both thought it made more sense. Had he ever laid wood before? Absolutely not. Had he seen it done? Nope. But we talked to a few knowledgeable friends who worked in construction and gave it a shot. That beautiful wood floor was a big plus when we sold the house a year later.
Over the years we've laid a lot of tile, replaced light fixtures, sink faucets, toilets, installed a sprinkler system, laid sod, made curtains, and generally made our houses into the homes we want to live in. I'll do a future post on the amazing custom woodwork David built in our dining room and entry way. (Am I proud of my husband? Yes, I am.)
Maybe my children think their dad can make or fix anything -- and he just about can -- but his many impressive skills were learned one at a time over many years of necessity and a willingness to give it a shot. Not only have we saved ourselves thousands of dollars, but we've had a lot of adventures and fun along the way!
Share To:
May 21, 2010
Using the Internet to Save (Janssen)
I love the Internet. That's probably not a big surprise to anyone, seeing as I have a graduate degree in information studies, not to mention two blogs.
I particularly love that the Internet means I can take advantage of great deals without spending my whole life researching them.
For instance, when I'm placing an order at an online store, I can easily Google "Lands End free shipping code" and see if I can get free shipping. Or to see if Old Navy has any 10% off codes. It takes me an extra 30 seconds and it saves me money. Nothing to complain about there.
As I've started getting more into coupons, I've also started using the power of Google to help me use them more efficiently.
For instance, this week, coupons.com had $3 Huggies coupons. I could have just taken them to the grocery store and used them there, but I had a sneaking suspicion that there was a better deal out there and a smarter way to use up those coupons. I Googled "Huggies Diaper Deal" and discovered that Rite Aid was running a sale.
Every package of Huggies was marked down to $8.99, which was already a better than average price for a drugstore. Then, if you joined RiteAid's mailing list, you got two "$5 off of $20" coupons, plus, you could use your Huggies coupons. And then, if you bought five packages, you could enter your receipt online at Rite Aid and get a voucher for a free package of Huggies diapers.
Not to mention, wipes were on sale for $2.50 a pack and there was a $2 off of 2 pack coupon as well.
If I'd used the coupons at my local grocery store, my diapers would have been $7.95 a package. Instead, they were $3.33 a package (or about nine cents a diaper).
All for two minutes of Googling. Oh, do I love the Internet or what?
Share To:
Apr 7, 2010
Homemade (Janssen)
If you're willing to eat the very cheapest bread available at the store (the store-brand of Wonder Bread, likely), it's probably least expensive to buy bread. If the idea of having your bread adhere to the roof of your mouth makes you a bit ill, however (like me!), you may be able to save money by making your own bread.
The bread I buy at the grocery store (whole wheat, minimal extra filler ingredients) costs, on sale, about $2.50 - $3.00 per loaf. After a while, this started to seem like a place I could save some money, have some healthier bread, and make my homemade-bread loving husband happier.
This is the recipe I use, which I calculate costs me about $0.70 per loaf (not counting the energy it costs to run the oven). I also think it might be a bit cheaper for you depending on where you live, since I know flour and sugar were cheaper in Texas than they are for me now in Boston.
I've also updated the recipe to use instant yeast, which I really like because it shaves a good hour off your time since you don't need to proof the yeast or let it rise before you shape it.
Whole Wheat Bread (recipe adapted from Mel's Kitchen Cafe)
(2 loaves)
2 3/4 cups warm water (for all intents and purposes, free)
1/4 cup sugar ($0.05)
1/4 cup oil ($0.06)
1 tablespoon instant yeast ($0.04)
1 tablespoon salt ($0.01)
1 tablespoon vital wheat gluten ($0.08)
1 tablespoon nonfat dry milk ($0.10)
1 cup white flour ($0.17)
4-5 cups white wheat flour ($0.89)
Combine yeast sugar, oil, salt, gluten and dry milk together in the bowl and mix with an electric mixer or by hand. Add white flour and mix well. Continue adding the whole wheat flour until the dough cleans the sides of the bowl and the dough is soft but not overly sticky. Knead for 10 minutes until a soft, smooth dough has formed.
Form into 2 loaves. Place the loaves into lightly greased bread pans and cover. Let them rise until the dough has risen about 1 1/2 inches above the top of the bread pan.
Place the bread pans in cold oven. Turn the oven on to 350 degrees and bake for 38 minutes.
Remove from the oven and turn out the bread onto a wire rack. Let cool completely before slicing.
I slice up my entire loaves, put them in bread bags (which I've saved from my store-bought bread), and stick them in the freezer. Easy and delicious.
Share To:
Apr 5, 2010
Skills That Save - Part 2 (Merrick)
When I was eleven or twelve, my mom signed me up for sewing lessons. My mom is a good seamstress but didn’t feel like she had the ability to teach all of us on her own. Although I wouldn’t say sewing was a great passion of mine, I enjoyed taking lessons for a few years, made many fun things for myself, liked bragging that I had made a clothing item when someone commented on it, and most of all developed a great skill that has saved me money throughout my life.
So today I want to tell you, and show you, how you can save money by learning to sew.
I think clothing is the biggest area wherein I’ve saved. Whether it’s being able to patch my husband’s dress pants when he puts a hole in them, making a few fabric flowers to spruce up a boring t-shirt, or buying a $3 extra large skirt and being able to make it my size, these are all areas I’ve been able to use my sewing skills to save money. Similarly, my mom has mentioned many times over the years that when they were on a tight budget, she was still able to update the house with new curtains or pillows, or make herself a new dress or her children new swimsuits, all because she could buy cheap fabric and knew how to sew.
Although the idea of sewing may be daunting, it’s really not as hard as you may think. Knowing how to operate your sewing machine, being able to read a pattern, and then practicing your sewing skills is really all you need to be on your way to saving money.
Here are a few good sources of inspiration to show you that it’s possible to save by sewing, and it’s not that hard:
Marisa of “New Dress A Day” buys $1 items at flea markets and garage sales, and then with a few cuts and a few seams, she turns them into adorable clothing items. Really, the level of sewing required for most of items she transforms is pretty simple – again, it’s just knowing how to use your machine and then practicing so you get better.
My Aunt Miriam recently blogged about making a dress for her daughter from an old skirt of hers. If you look at the photo in this post, it’s a simple dress that probably required very little sewing, but turned out very cute and was completely free.
Make It and Love It is another blog I look at frequently. She is all about repurposing clothing – anything from shoes, to mens shirts, to her children's clothing, and usually spends little to no money on these updates. And the best part is, she has tutorials for many of the items she makes.
Even with a basic knowledge of sewing, which is fairly easy to acquire, this skill will help you save money. By updating old clothing with cute embellishments, sewing a simple seam to make a shirt fit better, putting a patch in worn out pants, or making $10 curtains, you can and will save a ton of money in the long run.
Share To:
Mar 26, 2010
Skills That Save (Merrick)
I recently read a magazine article about saving more than you earn. It went through some basic ideas on how to save money, one of which was to “Get An Education.” They didn’t necessarily mean go to college, but to develop skills and educate yourself on ways that can help you save money. A few of their suggestions were to learn budgeting, computer skills, cooking and/or car maintenance. With the help of a book, internet tutorials, or a friend, you could acquire skills that will save you hundreds or thousands of dollars a year.
One skill that I acquired a few years ago, which I think falls into this category, was cutting my husband’s hair.
Before we got married, Philip went to the local hair school for his haircuts. Like most men who keep their hair short, he went in every 3-4 weeks for a cut. Although it was only $12 or so for a cut plus the tip, it added up pretty quickly when we were forking that over every three weeks.
When Philip suggested, only a few weeks after we got married, that I learn how to cut his hair so we could cut this expense out of our monthly budget, I quickly agreed. Yes, it took a few times for me to really get the hang of it, and yes, one time I put the wrong guard on and the haircut ended in tears (tears from me, not him), but after a few months, my skills improved, I figured out exactly what he liked, and was able to produce a great haircut almost 100% of the time.
Although saving roughly $150 a year on haircuts may not seem like a ton to you, this one skill has given me confidence to learn other skills that will save us money. And if I can learn five other skills that will save me $150 a year each, that will add up very quickly and suddenly I’ll have nearly $1000 per year of extra money that could go toward a vacation, or new clothes, or something way more awesome than a haircut.
So readers, do you cut your husband/children’s hair? What other skills do you have that help save you money?
Share To: